Django之ORM操作(七)
QuerySet API参考:官网链接:https://docs.djangoproject.com/en/2.0/ref/models/querysets/#queryset-api-reference
一、Django调用mysql增删改查的例子
1.1 主站下的设置
主站urls.py设置:
from django.contrib import admin
from django.conf.urls import url,include
from django.urls import path
from cmdb import views

urlpatterns = [
    path('admin/', admin.site.urls),
    url(r'^cmdb/',include("cmdb.urls"))
]
1.2 cmdb下的设置
models.py的设置:
from django.db import models
# Create your models here.
class UserGroup(models.Model):
uid = models.AutoField(primary_key=True)
caption = models.CharField(max_length=32,unique=True)
ctime = models.DateTimeField(auto_now_add=True, null=True)
uptime = models.DateTimeField(auto_now=True, null=True)
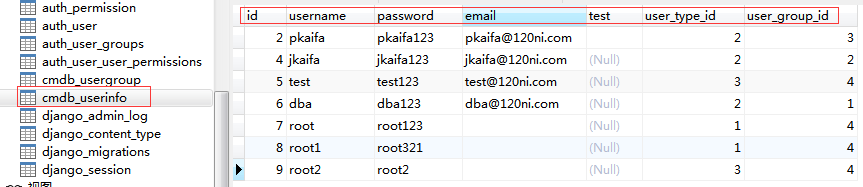
class UserInfo(models.Model):
# id列,自增,主键
# 用户名列,字符串类型,指定长度
# 字符串、数字、时间、二进制
username = models.CharField(max_length=32,blank=True,verbose_name='用户名')
password = models.CharField(max_length=60, help_text='pwd')
email = models.CharField(max_length=60)
test = models.EmailField(max_length=19,null=True,error_messages={'invalid': '请输入密码'})
# user_group_id 数字
user_group = models.ForeignKey("UserGroup",to_field='uid',on_delete=models.CASCADE)
user_type_choices = (
(1, '超级用户'),
(2, '普通用户'),
(3, '普普通用户'),
)
user_type_id = models.IntegerField(choices=user_type_choices,default=1) #有个默认值,插入字段的时候如果user_type_id是空值的话默认就是1。python manage.py makemigrations
python manage.py migrate

#创建了两个数据库并插入了一些数据。
urls.py设置:
from django.conf.urls import url,include
from django.contrib import admin
from cmdb import views

urlpatterns = [
    url(r'^login/', views.login),
    url(r'^index/', views.index),
    url(r'^user_info/', views.user_info),
    url(r'^group_info/', views.group_info),
    url(r'^userdetail-(?P<nid>\d+)/', views.user_detail),
    url(r'^userdel-(?P<nid>\d+)/', views.user_del),
    url(r'^useredit-(?P<nid>\d+)/', views.user_edit),
]
views.py设置:
from django.shortcuts import render,HttpResponse,redirect
from cmdb import models
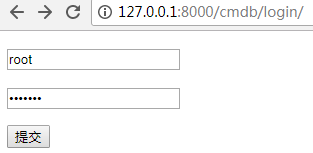
def login(request):
if request.method == "GET":
return render(request,'login.html')
elif request.method == "POST":
u = request.POST.get('user')
p = request.POST.get('pwd')
obj = models.UserInfo.objects.filter(username=u,password=p).first() #这种方式就是两种结果要么obj存在要么就不存在
# count = models.UserInfo.objects.filter(username=u, password=p).count()
if obj: #obj存在就说明用户名密码验证成功了
return redirect('/cmdb/index/')
else: #obj为false就说明密码验证失败需要重新输入用户名密码
return render(request,'login.html')
else:
# PUT,DELETE,HEAD,OPTION...
return HttpResponse('Haha,welcome to Index!')
def index(request):
return render(request,'index.html')
user_type_choices = ( #这里可以不存在的,我是为了user_type_choices才在这里加了下
(1, '超级用户'),
(2, '普通用户'),
(3, '普普通用户'),
)
def user_info(request):
if request.method == "GET":
user_list = models.UserInfo.objects.all()
group_list = models.UserGroup.objects.all()
return render(request,'user_info.html',{'user_list': user_list, "group_list": group_list,'user_type_list':user_type_choices})
elif request.method == "POST":
u = request.POST.get('user')
p = request.POST.get('pwd')
t = request.POST.get('type_id') #这里如果不获取就走默认值是1。
g = request.POST.get('group_id')
models.UserInfo.objects.create(username=u,password=p,user_type_id=t,user_group_id=g) #这是在userinfo表里插入了一条字段
return redirect('/cmdb/user_info/')
def group_info(request):
if request.method == "GET":
group_list = models.UserGroup.objects.all()
return render(request,'group_info.html',{ "group_list": group_list})
def user_detail(request,nid):
obj = models.UserInfo.objects.filter(id=nid).first()
# 去单挑数据,如果不存在,直接报错
# models.UserInfo.objects.get(id=nid)
return render(request,'user_detail.html', {'obj': obj})
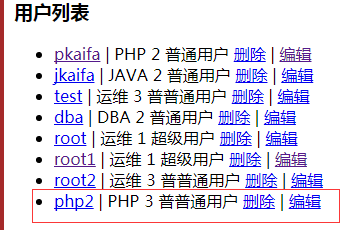
def user_del(request,nid):
models.UserInfo.objects.filter(id=nid).delete()
return redirect('/cmdb/user_info/')
def user_edit(request,nid):
if request.method == "GET":
obj = models.UserInfo.objects.filter(id=nid).first()
return render(request,'user_edit.html',{'obj': obj})
elif request.method == "POST":
nid = request.POST.get('id')
u = request.POST.get('username')
p = request.POST.get('password')
models.UserInfo.objects.filter(id=nid).update(username=u, password=p)
return redirect('/cmdb/user_info/')1.3 templates下的设置:
login.html:
<!DOCTYPE html>
<html lang="en">
<head>
    <meta charset="UTF-8">
    <title>Title</title>
</head>
<body>
    <form action="/cmdb/login/" method="POST" enctype="multipart/form-data">
        <p>
            <input type="text" name="user" placeholder="用户名" />
        </p>
        <p>
            <input type="password" name="pwd" placeholder="密码" />
        </p>
        <input type="submit" value="提交"/>
    </form>
</body>
</html>
index.html:
<!DOCTYPE html>
<html lang="en">
<head>
    <meta charset="UTF-8">
    <title>Title</title>
    <style>
        body{
            margin: 0;
        }
        .menu{
            display: block;
            padding: 5px;
        }
    </style>
</head>
<body>
    <div style="height: 48px;background-color: black;color: white">
        用户和用户组管理
    </div>
    <div>
        <div style="position: absolute;top:48px;bottom: 0;left: 0;width: 200px;background-color: brown;">
            <a class="menu" href="/cmdb/user_info/">用户管理</a>
            <a class="menu" href="/cmdb/group_info/">用户组管理</a>
        </div>
        <div style="position:absolute;top:48px;left: 210px;bottom: 0;right: 0;overflow: auto">
        </div>
    </div>
</body>
</html>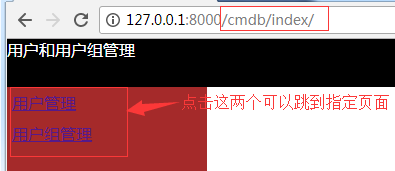
user_info.html:
<!DOCTYPE html>
<html lang="en">
<head>
    <meta charset="UTF-8">
    <title>Title</title>
    <style>
        body{
            margin: 0;
        }
        .menu{
            display: block;
            padding: 5px;

        }
    </style>
</head>
<body>
    <div style="height: 48px;background-color: black;color: white">
        用户管理
    </div>
    <div>
        <div style="position: absolute;top:48px;bottom: 0;left: 0;width: 200px;background-color: brown;">
            <a class="menu" href="/cmdb/user_info/">用户管理</a>
            <a class="menu" href="/cmdb/group_info/">用户组管理</a>
        </div>
        <div style="position:absolute;top:48px;left: 210px;bottom: 0;right: 0;overflow: auto">
            <h3>添加用户</h3>
            <form method="POST" action="/cmdb/user_info/">
                <input type="text" name="user" />
                <input type="text" name="pwd" />
                <select name="group_id">
                    {% for item in group_list %}
                        <option value="{{ item.uid }}">{{ item.caption }}</option>
                    {% endfor %}
                </select>
                <select name="type_id">
                    {% for item in  user_type_list %}
                        <option value="{{ item.0 }}">{{ item.1 }}</option>
                    {% endfor %}
                </select>
                <input type="submit" value="添加"/>
            </form>
            <h3>用户列表</h3>
            <ul>
                {% for row in user_list %}
                    <li>
                        <a href="/cmdb/userdetail-{{ row.id }}/">{{ row.username }}</a> |
                        <span> {{ row.user_group.caption }} </span>
                        <span> {{ row.user_type_id}} </span>
                        <span> {{ row.get_user_type_id_display }} </span>
                        <a href="/cmdb/userdel-{{ row.id }}/">删除</a> |
                        <a href="/cmdb/useredit-{{ row.id }}/">编辑</a>
                    </li>
                {% endfor %}
            </ul>
        </div>
    </div>
</body>
</html>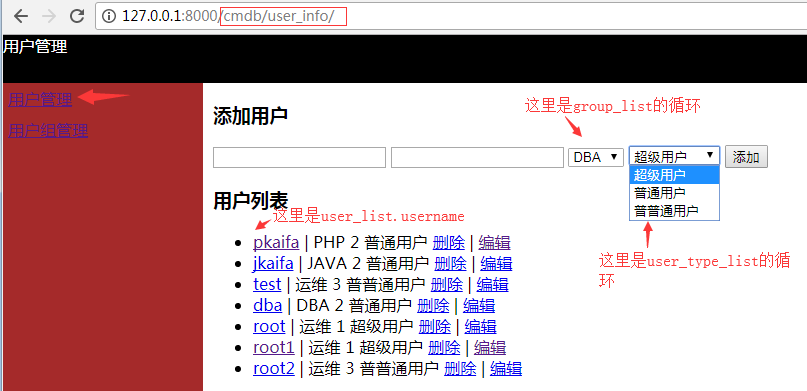
#这里注意row.user_type_id是直接关连到models.py里面的元祖里面查询,row.get_user_type_id_display是将关连的models.py里user_type_choices里面id所对应的名称显示出来。
#通过上面两个字段就把用户在user_type_choices所对应的权限id和权限名称打印了出来。

#从测试来看添加用户是成功的。

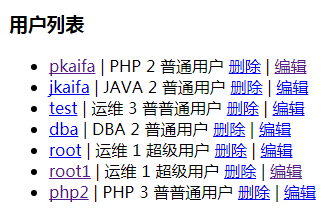
#可以看到root2这个用户已经被删除掉了,models.UserInfo.objects.filter(id=nid).delete()并不需要页面,只要有href这个url,就会把nid通过urls传递给views的user_del(request,nid)函数。
user_detail.html:
<!DOCTYPE html>
<html lang="en">
<head>
    <meta charset="UTF-8">
    <title>Title</title>
    <style>
        body{
            margin: 0;
        }
        .menu{
            display: block;
            padding: 5px;
        }
    </style>
</head>
<body>
    <div style="height: 48px;background-color: black;color: white">
        用户信息
    </div>
    <div>
        <div style="position: absolute;top:48px;bottom: 0;left: 0;width: 200px;background-color: brown;">
            <a class="menu" href="/cmdb/user_info/">用户管理</a>
            <a class="menu" href="/cmdb/group_info/">用户组管理</a>
        </div>
        <div style="position:absolute;top:48px;left: 210px;bottom: 0;right: 0;overflow: auto">
            <h1>用户详细信息</h1>
            <h5>{{ obj.id }}</h5>
            <h5>{{ obj.username }}</h5>
            <h5>{{ obj.password }}</h5>
        </div>
    </div>
</body>
</html>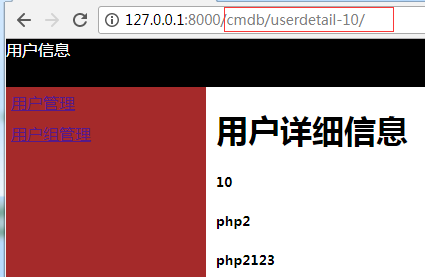
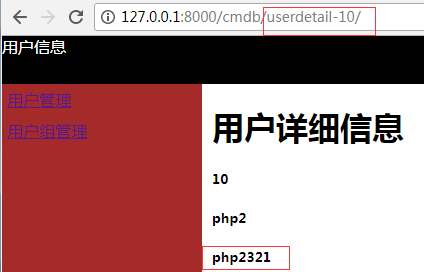
#obj = models.UserInfo.objects.filter(id=nid).first(),这个nid就是url那里的10,已经传递给urls.py,然后就交给了views.py里的user_detail(request,nid),然后obj就是id是10的用户的字典。
user_edit.html:
<!DOCTYPE html>
<html lang="en">
<head>
    <meta charset="UTF-8">
    <title>Title</title>
    <style>
        body{
            margin: 0;
        }
        .menu{
            display: block;
            padding: 5px;
        }
    </style>
</head>
<body>
    <div style="height: 48px;background-color: black;color: white">
        用户编辑
    </div>
    <div>
        <div style="position: absolute;top:48px;bottom: 0;left: 0;width: 200px;background-color: brown;">
            <a class="menu" href="/cmdb/user_info/">用户管理</a>
            <a class="menu" href="/cmdb/group_info/">用户组管理</a>
        </div>
        <div style="position:absolute;top:48px;left: 210px;bottom: 0;right: 0;overflow: auto">
            <h1>编辑用户</h1>
            <form method="post" action="/cmdb/useredit-{{ obj.id }}/">
                <input style="display: none" type="text" name="id" value="{{ obj.id }}" />
                <input type="text" name="username" value="{{ obj.username }}" />
                <input type="text" name="password" value="{{ obj.password }}"/>
                <input type="submit" value="提交" />
            </form>
        </div>
    </div>
</body>
</html>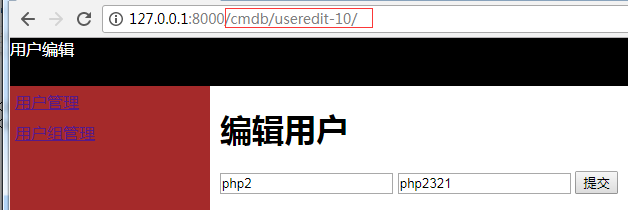
#通过测试结果可以看出已经将php2用户的密码更改了。obj.id这里是不应该更改的,因为 models.UserInfo.objects.filter(id=nid).update(username=u, password=p)要根据这个id值来更新,所以display: none。
二、从mysql取值为对象、字典和元组
2.1 cmdb下的设置:
models.py设置:
class Business(models.Model):
    caption = models.CharField(max_length=32)
    code = models.CharField(max_length=32,null=True,default="SA")   #如果这条是后加的,那么可以通过null=True或者default="SA"让增加数据库字段的时候正常通过
python manage.py makemigrations
python manage.py migrate

#给数据库添加点字段
urls.py设置:
url(r'^business$', views.business),
views.py设置:
def business(request):
    v1 = models.Business.objects.all()  ##这种取值格式类似于:QuerySet  # [obj(id,caption,code),obj(id,caption,code),obj(id,caption,code) ]
    v2 = models.Business.objects.all().values('id','caption') #这种取值也是QuerySet形式,但是只会把values()里面关键字对应的字段取出来
    v3 = models.Business.objects.all().values_list('id','caption','core')  #这个也是QuerySet的形式,不过是元组的形式。(0:id,1:caption,2:core)这种
    return render(request, 'business.html', {'v1': v1,'v2': v2, 'v3': v3})
2.2 前端页面的设置:
business.html设置:
<!DOCTYPE html>
<html lang="en">
<head>
    <meta charset="UTF-8">
    <title></title>
</head>
<body>
    <h1>业务线列表(对象)</h1>
    <ul>
        {% for row in v1 %}
            <li>{{ row.id }} - {{ row.caption }} - {{ row.code }}</li>
        {% endfor %}
    </ul>
    <h1>业务线列表(字典)</h1>
    <ul>
        {% for row in v2 %}
            <li>{{ row.id }} - {{ row.caption }}</li>
        {% endfor %}
    </ul>
    <h1>业务线列表(元组)</h1>
    <ul>
        {% for row in v3 %}
            <li>{{ row.0 }} - {{ row.1 }}</li>
        {% endfor %}
    </ul>
</body>
</html>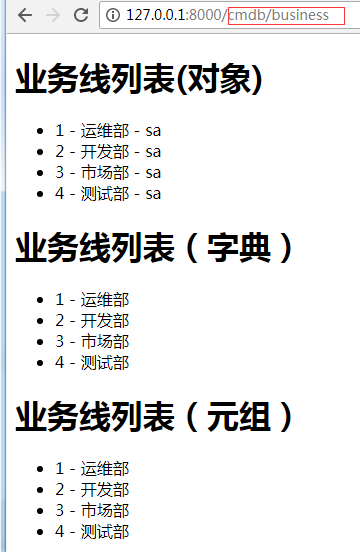
注:
获取一个对象,如果不存在就报错:
models.business.objects.get(id=1)
获取对象,如果不存在返回None:
modes.business.objects.filter(id=1).first()
#一般values取出来就是QuerySet形式,values_list取出来就是元组形式。
三、外键约束和跨表查询的例子
3.1 cmdb下的设置:
models.py设置:
class Host(models.Model):
    nid = models.AutoField(primary_key=True)
    hostname = models.CharField(max_length=32,db_index=True)
    ip = models.GenericIPAddressField(protocol='ipv4',db_index=True)
    port = models.IntegerField()
    b = models.ForeignKey(to="Business",to_field='id',on_delete=models.CASCADE)
python manage.py makemigrations
python manage.py migrate
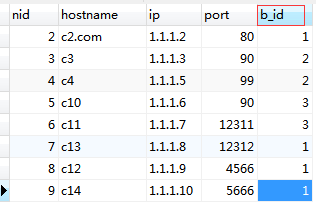
#插入一些字段,可以看到b是关联外键,自动会在b字段后面加上_id。
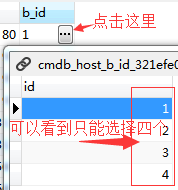
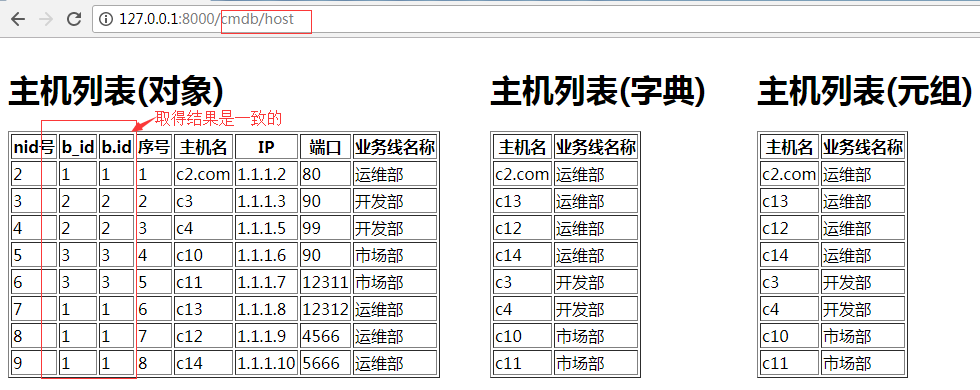
#上图中b关联business里面的id字段,所以就被约束只能使用business里面id字段里面有的值。
views.py设置:
def host(request):
v1 = models.Host.objects.filter(nid__gt=0)
# QuerySet [hostobj(ip.host(..)),]
# for row in v1:
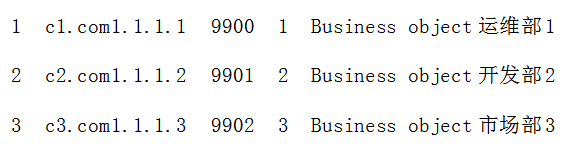
# print(row.nid,row.hostname,row.ip,row.port,row.b_id,row.b.caption,row.b.code,row.b.id,sep='\t')
# return HttpResponse("Host")
#row.b_id和row.b.id,虽然值相同,但不同的是一个没有跨表,一个跨表了。
#sep='\t'为字段间加空格
#row.b展示为Business,这就相当于一个对象,代表了另一张表里面一整行数据,通过.可以获取这行数据其他列的数据。
v2 = models.Host.objects.filter(nid__gt=0).values('nid','hostname','b_id','b__caption') #nid__gt=0就是nid大于0的意思
# QuerySet: [ {} ]
# print(v2)
# for row in v2:
# print(row['nid'],row['hostname'],row['b_id'],row['b__caption'])
v3 = models.Host.objects.filter(nid__gt=0).values_list('nid','hostname','b_id','b__caption')
# QuerySet: [ {} ]
# print(v2)
return render(request, 'host.html', {'v1': v1,'v2': v2,'v3': v3})#这里重点,values里面只能是字符串,所以要跨表就是b__caption这样.其实就是将b__caption再交给django来处理,当然这是django所支持和要求的格式。
#row.b_id和row.b.id前者没有跨表后者跨表查询了,跨表查询就是发起了两次mysql的查询,所以前者的写法要好一点。
#sep='\t'为字段间加空格django后端输出的效果图:
3.1 前端html页面设置
host.html设置:
<!DOCTYPE html>
<html lang="en">
<head>
    <meta charset="UTF-8">
    <title>Title</title>
</head>
<body>
    <div style="float: left">
    <h1>主机列表(对象)</h1>
    <table border="1">
        <thead>
            <tr>
                <th>nid</th>
                <th>b_id</th>
                <th>b.id</th>
                <th>序号</th>
                <th>主机名</th>
                <th>IP</th>
                <th>端口</th>
                <th>业务线名称</th>
            </tr>
        </thead>
        <tbody>
                {% for row in v1 %}
                    <tr>
                       <td>{{ row.nid }}</td>
                   <td>{{ row.b_id }}</td>
                  <td>{{ row.b.id }}</td>
                        <td>{{ forloop.counter }}</td>
                        <td>{{ row.hostname }}</td>
                        <td>{{ row.ip }}</td>
                        <td>{{ row.port }}</td>
                        <td>{{ row.b.caption }}</td>
                    </tr>
                {% endfor %}
        </tbody>
    </table>
    </div>
    <div style="float: left;margin-left: 50px">
    <h1>主机列表(字典)</h1>
    <table border="1">
        <thead>
            <tr>
                <th>主机名</th>
                <th>业务线名称</th>
            </tr>
        </thead>
        <tbody>
            {% for row in v2 %}
                <tr hid="{{ row.nid }}" bid="{{ row.b_id }}">
                    <td>{{ row.hostname }}</td>
                    <td>{{ row.b__caption }}</td>
{#                因为涉及到跨表查询,所以前端的html页面如果要执行跨表查询的话也需要b__caption的形式#}
                </tr>
            {% endfor %}
        </tbody>
    </table>
    </div>
    <div style="float: left;margin-left: 50px">
    <h1>主机列表(元组)</h1>
    <table border="1">
        <thead>
            <tr>
                <th>主机名</th>
                <th>业务线名称</th>
            </tr>
        </thead>
        <tbody>
            {% for row in v3 %}
                <tr hid="{{ row.0 }}" bid="{{ row.2 }}">
                    <td>{{ row.1 }}</td>
                    <td>{{ row.3 }}</td>
                </tr>
            {% endfor %}
        </tbody>
    </table>
    </div>
</body>
</html>